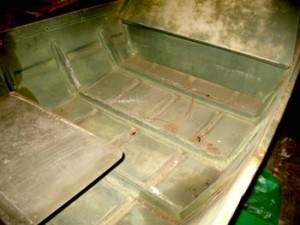
Happy New Year to All! The Holiday season keeps most of us pretty busy and for most the boat boat projects are put on hold, no exception here. I did manage to find some time early in the Holiday season to do more work on the jon boat. I decided to change the LIVE WELL into a storage box. This WELL is not water tight from the top so the storage may be limited to objects that can get wet, but at least these objects (like rope) are off the sole. Also I am thinking about ways to make the well lid watertight. But here is what I did to the LIVE WELL. The following picture shows the LIVE WELL as it came from the factory.
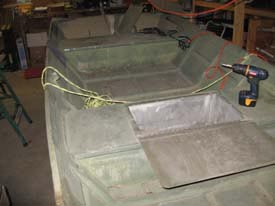
The WELL is un-coated aluminum with a drain at the bottom. I cleaned and wire brushed the insides of the WELL until it was clean, then spray painted the box with etching primer for aluminum (Krylon product) than painted the inside of the WELL with 3 coats of pick-up truck bed paint. This will give the inside of the WELL a scratch resistant surface as well as to prevent pitting corrosion from items in the WELL that get wet.

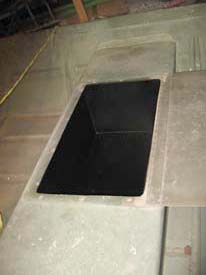
No reason for the black color other than it will look good with the final paint color of the boat.
The next project to tackle on this boat will be the completion of the transom. Stay tuned.
As mentioned in the post on November 25th, we were getting ready to tackle repairing the after section of the jon boat because of severe pitting corrosion that ate through the hull bottom due to florists foam put in place of regular flotation foam during a previous repair.
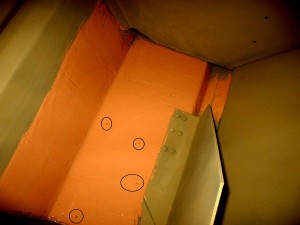
Port side. Holes with rivets are in the black circles.
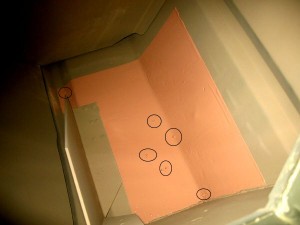
Starboard side. Holes with rivets are in the black circles
What we did first was to clean up the aluminum in the areas of the pitting with a wire brush and determined where the pitting created holes in the hull and where it only did mild surface damage. We identified holes on both sides of the hull and also determined the holes were the only serious damage. Some of the other surface damaged by pitting were shallow. We then applied Rustoleum Self Etching primer for the undercoat then painted the surfaces with a Rustoleum camouflage color. After drying we drilled out the pits with 1/8″ drill. Luckily none of the pits themselves were larger than 1/8″. We then applied a 2-3mm coating of 3M 5200 all over the areas. (in the photos it is the orange color, the camera flash distorted the actual color) using a plastic spreader. This layer of 5200 smoothed the hull surface by filling in the eroded areas. We then inserted rivets in all of the holes while the 5200 was still wet. The 5200 seals the rivets, making sure the rivet will not leak over time. If the pitting areas were deeper or more holes found we might have placed an aluminum plate over the area using the 5200 as an adhesive. As it was we feel the rivet solution was the best for this repair.
The next repair is the transom. The plywood stiffener was rotted and needed to be replaced. Stay tuned.
Having worked with wood and fiberglass boats, this project is interesting because the boat is made out of aluminum. The old standby known as a jon boat, a flat bottom boat with a square bow and low sides has been a favorite in many lakes and swamps of coastal USA.
The jon boat I am working on is a 14 foot, 30 plus year old Aluma Craft jon boat.The goal is to put this boat back in tip top shape and sell it. There is no doubt this boat will go on many years. A survey of the boat found that the wooden transom stiffener was rotted. It caused excessive pitting in the aluminum transom. Luckily no intense depth to the pits. Because pieces of flotation were found in boat bottom in the aft section, we opened rear seats and found not only Styrofoam flotation but FLORISTS FOAM! The wooden transom piece was a re-build and when done the rear seats had to be opened and the repair person must have needed to replace styrofoam When that got wet it held the water and that also caused pitting corrosion on the bottom of the aft section of the hull. Other than that and a few minor dents plus the need for a new paint job the boat is in good physical condition.
Already started re-furbishing the insides of the rear seats and transom. You can see in the photo the inside of one of the rear seats. The inside was thoroughly cleaned, undercoated and painted. Also notice the black dots(holes) in the bottom of the boat inside the seat in front of the bracket. They are pits that ate through the aluminum hull. They are the next project to be worked on.

Bayside Marine Design Boat Building blog